For those of you that know me - you know my obsession - ok obsession this month is photography - and more recently going into photoshop. Here are some Before and afters. The Before's are straight out of the camera. No more words - just photos for now:
Saturday, May 28, 2011
Photoshop - Before and Afters
Wednesday, May 25, 2011
Prop Junkie Challenge
Over at Prop Junkies Facebook page (here) they do an inspiration theme - and this week's inspiration theme is Tea Party. I am newer to their site and this is my first entry - I can't wait to see what the following weeks bring.
It just so happens that last summer (before I totally got obsessed with photography), I set up a tea party for my girls. Here are two (of many!) of my favorites:
It just so happens that last summer (before I totally got obsessed with photography), I set up a tea party for my girls. Here are two (of many!) of my favorites:
Tuesday, May 24, 2011
Just a day at the park
I think you'll be seeing more photography from me in the near future - as that is my latest obsession. Here is this weekend - a day at the park.
Sunday, May 22, 2011
I Heart Faces - Yellow Challenge
Here is my photo over at I Heart Faces. The challenge this week is "Yellow".
This is my littlest one. He thinks he is such a big boy - he is carrying an old Tonka truck. The yellow just really pops in this picture.
Go head over to I Heart Faces to check out all the other great yellow photo's.
Quick Card Tutorial
I was on my way to a baptism, so I thought I would whip up a quick card. I didn't have any cute girly type cards. So here is a quick tutorial on how to make the card.
First I started by measuring an envelop I had, that I wanted to use. It was 7 1/4 by 5 1/4.
Then I took my paper - I took a full sheet, lined up the long side (11 inch side), along the top, and scored it right down the 5 inch side. Since the envelope is 5 1/4, this will allow it to fit. Then fold it down so your sheet in half.
Then I went to my trimmer. Then I line it up to the 5 inch mark, and trimmed off the excess from the one side where you scored.
Then score the other side and cut at 7 inches. Since the other side is the 7 1/4.
Here are your dimensions 5 x 7 (Actual size of the paper is 10 x 7, scored down the 5 inch long side)
Then I wanted an offset color on the front. I cut a 4 1/2 by 6 1/2 inch cream color.
Got my corner chomper and cut it on the 1/2 inch side.
Then I wanted to add a little something, so I went to my ribbon collection. I cut it slightly longer than the width of the cream paper.
I got my red sticky tape...
Put it on one side of the ribbon....
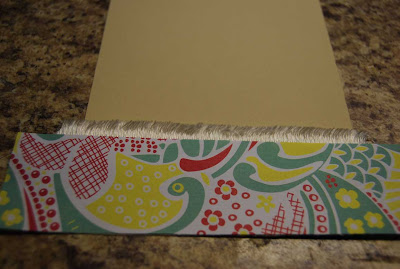
Then I found a scrap picture of a cute paper, it was about 2 inches wide, and I cut it slightly over the cream paper.
Then I lined it up with the paper and stuck the ribbon on it.
Then I taped it to the cream paper. (see the over-hang - trim that off)
Here you can see the dimensions - I rounded the corners here too.
I used the Sizzix Flowers Layers #4. And cut two flowers out (one of two different colors)
I found two buttons, and some floss (is that what it is called...)
Then I cut a piece of the thread, put it in the button - and tied it.
I did this to both of the buttons
Find some glue dots - I use the Zots brand - they are at Joann's and are relatively inexpensive.
Put one on the back of your button.
Line them up on your flower. I drew some lines as stem's on the flowers too.
I found a "celebrate" clear stamp.
Found some brown ink, and the same cream card stock.
Ta-da
Trimmed the paper to be about an inch by an inch and 3/4's
Rounded the corners - this time with a 1/4 inch.
Inked the sides with the same brown as I stamped.
Get some dimensional dots.
I used about 4 - wanted to make sure it was really stuck down there.
It's starting to shape up.
I put the cream onto the purple paper we got earlier. On the envelope I trimmed some cute paper to fit along the bottom - and stamped some cute baby feet in the top corners.
Here is a close up of the card.
Close up of the envelope.
I wanted to add a little something to the envelope. I took three prima flowers and a pearl. I took some wire - threaded it through. Then put some glue dots on the bottom.
Much better - name added - all set!
Because of the purple being so dark. I wanted the inside to be a lighter color to write a note.
Ten I took an existing bag I had - put a cute gift inside - topped it with the card. On the front - I took a long tag - stamped her name - tied it on. But I topped it with a cute hair clip I made - added a little color and extra flair.
Subscribe to:
Comments (Atom)


