Wednesday, September 12, 2012

It's beginning to look a lot like Christmas

This one is for my good friend Carrie - she informed me that there is about 100 days till Christmas and she wants to be able to take some tree pictures.

So I looked back through my December 2011 pics and thought I would share some of the exposures.  I have learned a lot since then, they are far from perfect - but - they work for me.  The biggest recommendation I have is to practice!!!


This one was my first attempt in November 2011.  It was hand held so a bit shaky, focused on the tree  vs. Mikey.  I tried to expose to the right of the tree I think.
1/25 sec at f/1.8, ISO 640

A tad bit underexposed - but - hey - I like it!
1/100 Sec @ f.2.2, ISO 6400

1/100 sec at f/2.2, ISO 4000

1/80 sec at f/2.2, ISO 4000

Because my aperture was at 2.2 there was no bursts in the lights.
 1/80 sec at f/2.2, ISO 4000

Brianna - exposed off her face: 
1/80 sec at f/2.2, ISO 4000

Hay hanging ornaments. Exposed off her face. 
1/100 sec at f/2.0, ISO 4000


The higher the aperture the more the burst: 10.0 sec at f/22, ISO 320

0.5 sec at f/22, ISO 3200
 

Playing - I have lots to learn on outdoor: 10.0 sec at f/22, ISO 1000.  The shutter speed was super slow to make up for the higher aperture to try and get some sparkle. 


Christmas Morning: 1/100 sec at f/2.2, ISO 6400


And this one is for you Carrie!!!  An old image - but relevant for tonight!!

1/4 sec @ f/2.0 ISO 100 - I was going for a lower ISO for a crisper image - and took this on the tripod.

Sunday, September 9, 2012

DIY Step stool for the kids

Well - I had another crazy productive weekend.  I should learn to take a break...

I had built my middle child a step stool when I did her bedroom. And it always makes it's way into everyone else's room.  So I thought I would make these stools here.  I just adore Ana White.  I am really working on turning my house into a homemade house....But anyways.

Here are the step stools I made - they are perfect for getting in and out of bed - brushing their teeth - trying to get their clothes on a top shelf.

So this one is Haydens - the first one I built. She wanted it Pink.

I did this one today - out of scraps - FREE!!!  Whooo hooo.  She wanted green - it goes with her room.

Then a little sneak peak to Mikey's room - this is the accent color in his room.

Then here is a quick sneak peak at one corner in his room.  I am super excited!


Oh - and we got a dog pen built for our new puppy!  We kind of winged it - and it worked out great.

Saturday, September 1, 2012

Bins for the Mudroom

I just realized now that I didn't post pictures of the mudroom we did.  So here it is - with the bins I made.

It started as a pantry with doors - and it drove me crazy!!!  So the doors came down and everything on the inside was built.


It has been done for a while, but wasn't finished.  So I made the bins and added a shelf to add more shoes on the bottom.


Before it was just a big huge square and the shoes were always all over the place.  Now there is a shelf to help organize them!

Then the bins - there is 5 in total.  I got the idea from the amazing Jamie at That's My Letter with this plan.

I think I am going to monogram them with everyones initials.

I painted them the same color as our front entry to bring the two rooms together.

I am happy that it is done. Well almost - a little trim to replace. But - we are

Sunday, July 8, 2012

I built my kids a house!

I built my kids a house...ok, a playhouse - but - they'll love it all the same!

What boggles my mind, is that I can take a stack of lumber, and turn it into something amazing!


Everything I did, I did by using the amazing Ana-White plans. 

I started on Tuesday by framing it.

It's starting to look like a house.

Then we went on to the deck on the Wednesday.

Made sure it was square and straight secure.

One thing I learned through the process was to check for square! It says it in all the plans, and I never do. Let me tell you - it's important :) I was off by 4 inches - let's just say if I didn't check - I don't think my house would have went together in the end!

On Thursday I took a little break to soak up the kiddo's on my vacation - we did a little reading where the house would go.  Friday and Saturday I painted and painted some more. Oh - and on Friday I decided to build the picnic table and chairs too!

And today it all got assembled. My first pass at roofing too!

Here is the picnic table.

The two gable walls.

The three (I build 4) chairs, each kid got to pick out their own fabric. I made pillows to match too.

The front side:

For the shutters I took some leftover wainscoting and 1x2's and made 6 quick shutters.  For the front door, I took the door cutout from the front of the house and trimmed it out with some 1x3's.

I think the three of them will like it!

It was a lot of work - but it makes me so crazy excited to finish something like this, and watch my kids grow with it and play with it!

Saturday, May 12, 2012

Teacher Appreciation Gift

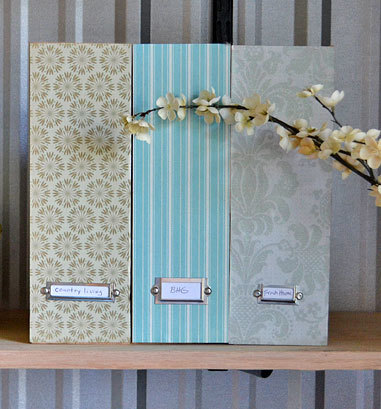
So this week was teacher appreciation week.  I tend to go a little nuts and like to have custom gifts for each of the teachers.  So this year I went to the amazing Ana White for inspiration. And I saw her Wood Magazine Files.


So I went to work in the garage.  I had a lot of plywood left over from when I did Hayden's bed. I got to cutting, I set out to make 6 of them - but ended up with 7 - I don't know how that happened.  

The funny thing is that when I went to finish them - they didn't line up perfectly how I wanted them to. So I ended up putting a different spin on them and covered the whole thing with scrapbook paper.


Brianna ended up bringing three to school - one for her teacher, one for the aide and then her favorite - her gym teacher - we made a special one for him.

Hayden brought two for each teacher to daycare, and so did Mikey. 


Then I whipped up some handmade cards with a little apple and a thank you stamp.  Forgot to take pictures of that.

They are cute and functional - and I had everything on hand!  Even better!

Saturday, April 21, 2012

A new Bed for Hayden

So if you haven't noticed - I just adore Ana White I have built so many projects.  My latest was my biggest!

Here is the final project!  I used these plans.

It's amazing that this can turn into the photo above! Here is all my 3/4 inch cabinet grade plywood ripped into their individual widths.  It was about $200 in lumber. I was so proud - during this project I overcame my fear of the circular saw - it's now my new BFF!!

Here are the 1x2 and 1x3's.  And the 1/4 inch is under there too ripped to the right width. Don't mind the crazy dirty, unorganized garage. After this project it got a make-over!

Starting to see progress!!!!  It all came together! It's built - just needs to be sanded and primed and painted.  What was entertaining is I was a WHOLE SHEET SHORT!!!  I only accounted for one tall tower - I didn't double it - so I found pieces floating around and made it work.  That piece on the far right - yup - that was a mis-cut piece of MDF left over from yet another project!

Yup - messed up the footboard too - I couldn't get it to work - because I was short. So I improvised with beadboard - and I am in love with it!


What's crazy is I took one of the busiest times at work (I work full-time with three little kids), to build this when I got home. It was something I could have control over.


I need to start liking this stage better - but I just don't yet. The painting. I did buy a Wagner sprayer- it worked pretty well. Ask me how the 2nd time goes though - to see if I cleaned it well enough.

I set up shop on a windy (don't recommend a windy day to use a power sprayer!).

I set up a sheet and had a roller and brush on hand - and was able to get 2 coats of primer and 2 coats of paint on in that day.


Then the assembly part!!!  Everytime I go in Hay's room I smile with accomplishment! I did it - and I did it all by myself (with the exception of the actual moving of the furniture!)

Hay plays more in her room than ever - now that she can find all her toys!

I adore Ana White!!! I built the caddy from her site too. I built 7 last easter.

The letters, and accessory pieces on to of the middle, all came from Hobby Lobby.

The bedding came from Target, and the baskets came from Joann's.

Here is how the footboard came out being "cobbled" together from leftover bead-board and 1x2;s and 1x3's!

My husband picked out this molding - it was a nice extra touch! (I should probably fill my nail holes)

There is so much storage - her jewelry, stuffed animals, nick-nacks. I love it

I also built the dress-up center for Hay's birthday last year.

I made 5 of these doll beds for Christmas.

Tried to get the whole shot in the mirror.

The project was so worth it!

Overall I think the room cost me around $500 - this included crown for the whole room, new bedding, accessories including almost 10 baskets.  I think that's a good price for a whole new room!

LinkWithin

Related Posts Plugin for WordPress, Blogger...