Showing posts with label gift. Show all posts

Tuesday, April 26, 2011

Create your own stencils

Today I am going to show you how I got the names on all my caddy's. If you didn't see all my caddy pictures - check them out here.


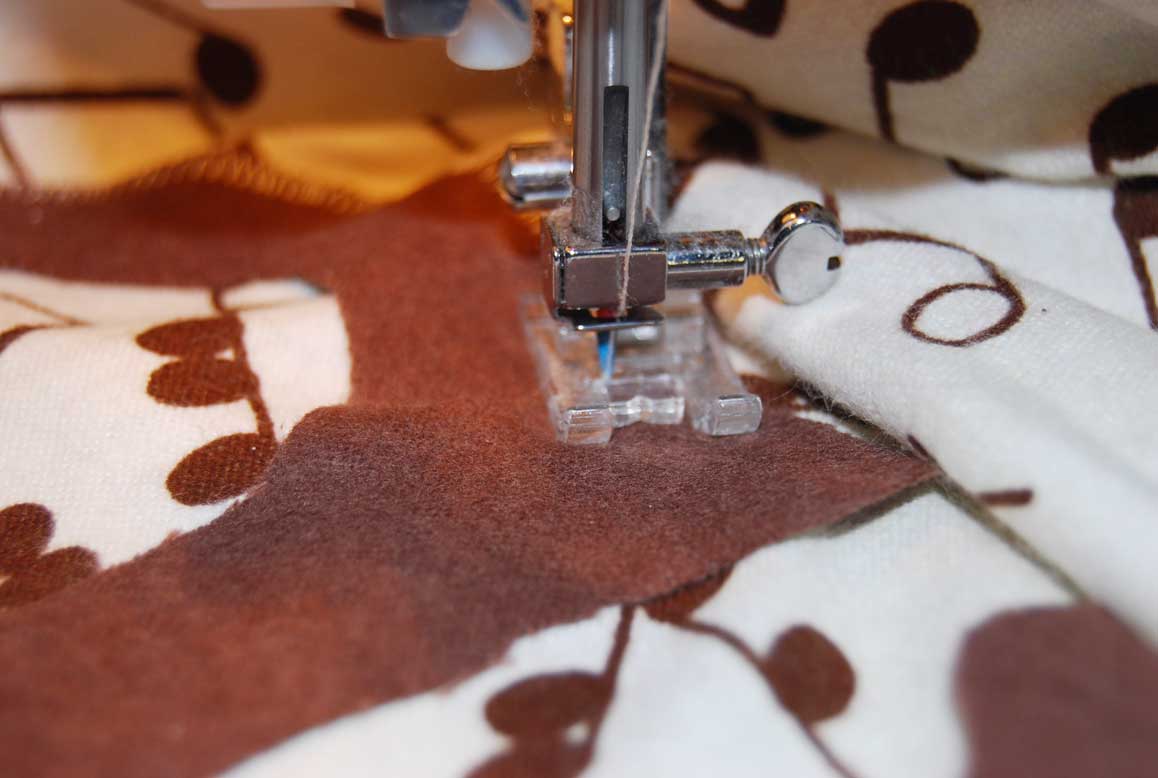
So first - I need a die cutting machine (I am too lazy for stencils).  I have a Cricut, so that is what I used.  So I used that.  I set my dials to a blade depth of 3 or 4.  Then I did a pressure of Medium (3), and the speed based on how delicate the cut is.  Mine wasn't bad - so I set it to high.  Instructions do come with the vinyl.  Follow them.

So below - you will see what it looks like after the cut.  They do sell transfer material specifically for vinyl.  If you have read my blog - you know I am cheap...no...not cheap - thrifty!  So - that stuff can get expensive - so I bought clear contact paper.  I cut my transfer paper to the same size as each word I cut out and was ready to go.

Here you can see a little shine on the vinyl, that is the contact paper.  Then rub it down with a credit card, Popsicle stick, anything really.

Then depending on what you want to do - you start to peel up the letters.  I wanted to paint the words on the caddys.  So I lifted the outside of the letters.  You can see what's stuck to the contact paper - that is what I will put on the caddy.  What is left on the original is left over.  (Good thing for me - you will see my craft fail in a bit!) You could also do it the opposite if you wanted the vinyl to be what gets stuck to the caddy.

Here you will see it ready to adhere to the caddy. It's stuck to the contact paper - this makes it a smooth transfer - trust me!  If you have tried it without a tranfer medium - it is an ugly un-smooth mess!

Here is the vinyl stuck to the caddy - ready to be painted.  Make sure you stick it on good.  Rub with a credit card, or your finger - make sure it is sealed tight around where you will be painting. 


Then - pick a paint color and put on a coat at a time.  I just used acrylic paints, and a cheap foam brush. 

Here is another one, you can see the air bubble between the H and the a

My assembly line set up of paint.  When it is dry - peel up the vinyl and you are ready to go.  If the paint isn't dry - it can leave some paint where you don't want it to be.

Finished product with paint. 

You will notice this one - not the original green I painted - but the same purple as the vinyl - ok - it is the vinyl. 

Here are some lessons learned and suggestions.
  1. If you can- use a cutting program to work out your names.  I used Sure-cuts-a-lot (I also have the gypsy for the cricut, and cricuts software - they both work as well).  I could see my 12x12 mat, and lay out exactly how I wanted it to be cut.  I measure my wood - and figured out I wanted it cut 4 inch high by 10 in wide.  So they were all pretty uniform, no matter if there was 7 letters or 4.
  2. If you can and have it - use a thicker paint than acrylics if you don't have a lot of time (or patience).  The lighter color acrylics took a lot of coats, because they went on thin.  But - it's cheaper and you can get a lot more colors!
  3. My big craft fail and lesson learned.  Don't use too many different types of paint.  I used a gloss spray paint, then an acrylic paint, and then a semi-gloss on top of that.  I went to peel off the vinyl - and guess what - yup - you got it - the paint peeled off to...Sigh....So I peeled off all of it, and used the actual vinyl instead.  Thankfully it happened on a girls one that I could use the purple, and not a boys one I would have had to start all over.  I hate wasting stuff, not to mention time, it was Saturday night when I finished them and I didn't want to paint again.

Wednesday, April 20, 2011

Cookie Basket

So there is an amazing person at my work who loves my kids.  She gave them each a present for Easter.  I was expecting something really small, but she went all out.  It was so super sweet - so I wanted to give her something nice.

I was having so much fun making sugar cookies the other day - so I thought I would make Easter Eggs.


I took 6 of them and put them in little treat bags and tied them with a ribbon.


Then I put them in a little basket with some of the grass that was left over from the gift to the kiddos. 

And there you have it.  A nice and thoughtful thank you gift.  I also included a handmade card.  On one side I wrote a note, and on the other I had my oldest sign her name, my middle draw a picture, and the baby just scribble in crayon. 

I had my daughter hand deliver it today - with a big smile and a thank you - I think we brightened her day. It feels so nice to thank people for their generosity.


Sunday, April 17, 2011

Cute Paper Bag Tutorial

Sorry I have been MIA for a while.  With everything our family went through last week - I have just been wanting to spend every second with my kiddo's.

I made my kids teacher appreciation gift last week - here is a quick tutorial on how to make the bags.  They really don't take long - and you can dress them up a lot of different ways.

First - get two pieces of paper.  I used 8.5 x 11.  Cut both at 8 inches square. (This makes a bag that is about 4 1/2 inches wide and 6 1/2 tall, you can make it as big or small as you want).

It will look like the below, an 8 inch square.

Then you scor your lines.   I messed up the first time - I had to re-cut my squares. You are going to scor both squares the exact same. First scor at 1/2 inch,

Then at 1 1/2 inch. 

Then at 2 1/2 inches. 

Rotate the paper once.  Then score at 1 1/2 

You will fold it like an accordion.  That little flap on top - that will hold your sides together. You want that to be folded up.

Then the one scor - that was done at 1 1/2, this is your bottom gusset. Fold that too.

Then you are going to cut and trim.  On the side that has three scor lines - you are going to cut out the 1/2 by 1 1/2 inch little piece. 

Then you will cut a little slit on the 2 1/2 inch scor line - up to the 1 1/2 inch scor line. 

I had a bunch of left over cuts from last Easter - so I just put together some things I had in a "cut" box. 

You have the option of  folding in the bottom flap to make it look a little more finished.

This is what the front side looks like before it gets assembled.  Decorate it before you finish your bag - it's a little easie r.

That little 1/2 inch piece, this is where you tape/glue goes. 

Then you line up the little flap up - with the other end.  Then you do it on the other side - to make your box. 

Then you fold down the bottom of the box. 


Then for the magic tape.  It's red tape - it's super tacky - and it will fold the bottom well.  If you use regular tape - the problem will be that it won't hold much weight. 

You peel back the red tape. 

Then it starts to look like a bag. 

One of my favorite tools - the crop-a-dile. 

I fold the bag - so the top corners matched - and punched a hole on each side.  This way they are even.  Then you put the eyelet  in the hole - you will need four.  This step is optional, I didn't do this for the teachers - because there was a whole lot of them - and I wanted it to be quick. It does make it look more finished though.

Then line up your crop-a-dile on the right settings and squeeze - and this sets your eyelet.  Do this on all 4 holes. 

And there you have it folks - a finished bag!  I just tied ribbon to finish it up.  Two equal pieces - small knots on each side.  Perfect for any holiday or occasion, just decorate as appropriate. 

The other nice thing is they hold cards perfectly - so if you wanted to make a bag full of cute cards to give as a gift - that would work too.  I did a quick tutorial on note cards here - they would fit perfectly inside.  A cute gift in probably under 15 minutes - and can most likely be done with materials you have on hand. 

Linking up to these parties:

Saturday, April 9, 2011

Personalized Baby Blanket

Do you want to learn how to sew a custom blanket for someone?
First I cut out the letters.  You can do it a couple ways.  If you have a die cutting machine, you can use that (i'll do a tutorial on that later).  My blade is getting dull - so I cut out the letters on Freezer paper on my Cricut, then ironed it on to my fabric - and cut them out.


Line them up on your blanket.

Then grab your Heat N' Bond.  This stuff is awesome!

You iron it on to the letters.  I cut mine into small strips - just enough to secure it to the blanket with out having to use pins.

Now - before you iron on the letters - make sure you peel off the white part.


Then line them up and grab your Iron.


Iron them on nice and good. 

Next - get the thread that you are going to want to sew the letters on to the blanket.


Set your machine.  You are going to want Zig Zag - and a tight stitch - probably 1 or 2. 

You are also going to want the widest width - mine was done at 5. 

Then line up needle so the right side where the needle goes down is right on the outside of the letter and the blanket.   You are going to just outline the letter with your zig zag stitch.

Now - when you are getting to a corner.  Keep your needle down, lift up your foot, and rotate, put down the foot, and then continue sewing.  Just like you do when sewing your blanket and you get to a corner. 

When you are done sewing your letters on - sew it like you would a blanket.  Remembering to leave an opening to flip it inside out.  And check and double check your right sides are together.

Pin your corners well.  Minky can be slippery. 

I pinned mine right on my ironing board because it was a smaller blanket.  I just went across the top, and then down the sides.   You will sew around the outside - trim the corners - then top stitch - just like my other baby blanket tutorial here.

Now - brace yourself.  I finished sewing and noticed a BIG FAIL - I started laughing and thought - wow - this is so typical of me!  See anything wrong with this picture!


Yeah - my a is totally backwards!!!!  Actually - it's upside down - so - when you are ironing and then sewing - double check all your letters and placement.  This is for my new baby niece for her baptism this weekend.  My brother can just laugh at me :)


Here is the up close detail of the letters.

Let's on the good one - that I didn't line the letters up the wrong way.

Hope you will take on a project like this - they come out super cute and aren't that bad to make.  I used flannel on one side - and a minky side on the other.

Tip Junkie handmade projects

LinkWithin

Related Posts Plugin for WordPress, Blogger...