Friday, December 31, 2010

Reward System


So i was surfing out in Blogland a while ago. I was surfing through How Does She If you haven't been there - you are missing out! AWESOME site!

Anyways.....

I saw a chore chart:

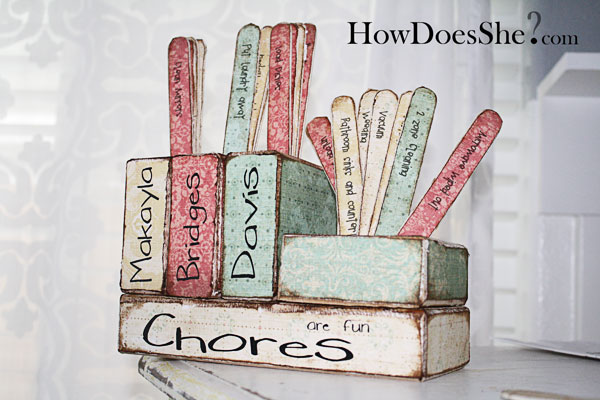
I thought it was awesome!!! I want to do something like that, BUT - My kids are still to little for chores, and I wanted to do a reward system, so I used this as my jump off point, I really gravitated to the popsicle sticks.

I was so tired of yelling at my kids and putting them in time out. Then I got thinking - I really never reward them when they are good, but they are punished when they are bad. Doesn't seem quite fair right - what is the incentive for not being bad - not going to time out?

So here come the Callahan Coins!

I looked downstairs in my craft room and got to thinking....what can I use that I already have.

I had these tins from the $1 store, they were like decorative tins. They were really ugly :) so I covered them - they were exactly 12x12 - to fit my scrapbook paper. I had wood coins and magnets and popsicle sticks and clothes pins. So I got to work.
Here is what it looks like on our fridge.
I took the tin's from the dollar store and covered them with scrap book paper I had. I just coated both sides with Modge Podge and stuck them together. I also rounded the corners with my corner chomper. I put eyelets in it too so it can hand with my crop a dile. Those things rock - they go right through tin!

This is where all of the coins are stored, until they are earned.

For the coins I used little wooden disks. There is a 5 and dime lace I live near - they were like $0.05 a piece - but you can find them at Joann's too. They are super cheap - and make great magnets. I had leftover round magnets. So I put scrapbook paper on top, and glued the magnet with E6000 (I think that is the glue). And tada - you have coins!

The rewards! I took an envelope - sealed it - and cut it in half. I decorated it with scrapbook paper and did a decorative punch on the top. It holds the rewards perfectly. I just decorated it with stickers I had on hand.

I secured it to the main chart with a simple decorated clothes pin. Done the same way as the coins - except I used ribbon instead of paper.

Then each girl gets there own chart. My Hayhay loves Blue - so everything is blue for her. I took a larger coin - I think it is about 2 inches around. And decorated it with on hand stickers and paper, and added a magnet.

Then Brianna got Pink - because that is her favorite. Decorated them the same way:


So here is the jist of it. When each girl earns 20 coins - they can pick from the prizes:
They are little things like: Dance Party (one of our Wii games), sticker, treat, shopping trip (meaning they get to go grocery shopping with us or something). But there surprisingly favorite part is one on one time with Mommy or Daddy. With three of them - they love the one on one time. My husband joked that "Daddy Time" was some sort of punishment. But both girls have requested it. It can range from a movie night with just one parent, to going off shopping, to reading in there room - there pick.

When they are bad - they loose a coin. I was pleasantly surprised (ok this is going to sound mean), how upset they got when they lost a coin. But when your almost three year old laughs in time out - she doesn't get that it is punishment. Loosing a coin - that hits home for them. BUT - when they are good - they look and say "Can I get a coin" OK - mostly it is "Can I get 4 coins because I am 4". They get to pick out there own coin when they earn it. It has been a life saver. Now - they will go that extra mile. "I shared my toy with Hayden - do I get a coin". I'll take it for as long as it lasts. So far we are on about 6 weeks and going strong!

Thursday, December 30, 2010

Cupcake Pies

So I bought an awesome book from BJ's. "What's New Cupcake?" from Karen Tack and Alan Richardson.

I looked through it and found a cupcake for every occasion and everyone!!! But - I was having company. I was having my grandma, aunt and parents over. And with three little kids - I had to make sure it was easy. I knew wanted to make something good and homemade because - my grandma had 8 kids and every meal was a feast. And - it was my first dinner real "adult" dinner party (OK - with three kids too - but still an intimate dinner party non the less).

So - my dessert was the first thing I wanted to figure out. My gram makes THE BEST pies - the best apple pie - so I did my version of baking pies - I made cupcakes. Aren't these awesome - and they were SO SUPER EASY!!! I made the cupcakes the night before - the kids separated the M&M's (with bribes they could get a piece of chocolate if they didn't eat them - it worked!)

Then I decorated them while they were still sleeping in the morning - they turned out SO super cute!!!


For the rest of my meal - SO easy, and SO yummy!!!!

Main meal - Roaster Chicken. I got the roaster bags you put in the oven - sprinkled a little flour in it - put the chicken in, and put Mrs. Dash over it - set it on low - and forgot about it.

Mashed Potato's - here is the BEST secret! BJ's mashed Potato's. I put two containers in a dish - put butter on top, cheddar cheese, mozzarella cheese, parmesan cheese, bacon and some of the bacon greece. (Yeah - those are healthy!) Ok - not healthy - but SO GOOD!!!! Put them in the oven at 350 for like 40 minutes - pretty much when everyone walked in the door.

On to the veggie - I did green beans wrapped in bacon. WOW. I got them from Our Best Bites Seriously - I printed out all there recipes - they look AWESOME!! Here is a picture of what they have on there site:
Don't they look awesome!!! That is pretty much what mine looked like :) Forgot to take a picture. But - I made a slight modification, because I didn't want to go back to the store. I used extra garlic instead of the onion, and balsamic vinegar instead of the rice vinegar. I should have doubled the recipe. I went to get 2nds - and my husband was like - Opps - I had three. This is guy who doesn't like veggies! They were AWESOME!!! I will make them again - and I will take pictures next time. But - again - so easy!!! I made them while the kids napped - and put them in the oven with the potato's when they went in.

Dishes were done when the guests arrived - and we had an awesome 4 generation dinner together - it was an awesome night - with great food!

Wednesday, December 29, 2010

Chocolate Peppermint Cupcakes by Glorious Treats

In my surfing I came across an awesome website. I haven't really gotten into the food crafting - mostly because I know I will just eat it all. But - these - I had to make!!!!! It was found at Glorious Treats

Wow - are they some good looking cupcakes!!!!


Here is a picture of how mine turned out.

This is mixing the cupcakes. It was my first attempt at cupcakes from scratch - I was impressed - it was easy, super chocolaty and Uber yummy!
Right before they went into the oven
Fresh out of the oven - don't they look yummy!
Ahh decorating! I used the peppermint and everything - they were SO GOOD!!!! Like super good! The kiss on top is the candy cane Hershey kisses - it gave it the perfect hint of extra mint!

I just followed her super simple directions - and enjoyed eating them!

And here is the post to her awesome cupcakes with directions: Chocolate Peppermint Cupcakes

Kitchen for Christmas

I don't know when it was that I first discovered Ana White but I knew right away that I would be obsessed! Great - all I needed was another obsession :) I printed out the kitchen plans - ok fine - I printed out nearly all the plans. I put them on the kitchen table and told my husband that I wanted to build this for the kids for Christmas. He laughed at me.

During a snow storm I started to freak out - thinking - there aren't enough hours in the day. My husband sighed, looked at me - got in the car and drove to Home Depot. I had all the cut plans laid out for all 4 pieces so we used the least amount of wood (MDF). He went with the excel sheet cut plans - and drove to the Depot. There was NO ONE in the store (could be the blizzard that was going on). This young guy said - you want it all cut? And they were there for an hour and a half and cut everything to size - and labeled it too!!! When he got home - I could breath - because I knew it could happen.

I called my dad and took the day off from work, and we got working. It slowly started looking like a kitchen!


So we got painting and finishing.


And then we had a finished product!!!!


We originally wanted to spray a chrome type - so it looked black and stainless steel. But - the silver spray paint didn't work so well. So we ended up painting it all black. We primed first, then painted with a flat black that we had on hand. The total for the building materials was about 90, it was essentially 3 sheets of MDF. Then I spent some money on hinges, and knobs. Overall the three pieces cost right around $120 to make - not to shabby I think!!!! I got the knobs for the stove from Hobby Lobby. The "burners" on the stove are just painted CD's :) I used Plexy Glass like Ana-White suggested in her plans. The bar on the stove is a towel bar for a bathroom. I still would like to put a clock face on it. I bought hinges, but the handles for the fridge I had leftover in the house. I still need to put magnet holders on the fridge and freezer. Overall I am SO excited. Except - the gift is from Santa - and I find myself biting my tongue when people come over - I have to keep saying "Santa made it".

A HUGE thank you to> Ana White for making that huge christmas gift possible for my kids - they adore it - all of them!

Parties I am linked up to:
Tip Junkie handmade projects

The Beginning

I have been thinking about starting a blog for over a year now - I think - if I would have just done it in the beginning - I would be a year in - instead of just starting.

I want a place to keep track of all the things I make, the things I want to make - and the awesome bloggers out there, giving them credit for inspiring me.

A little background. I am a full time working mom of three kids - currently 4 and under. My oldest is 4.5, my 2nd is almost 3 and my baby boy is just over a year. Trying to balance my time with my kids, working, time for my husband, and making our home a home is a juggling act for sure.

I find I am very obsessive. I go from being obsessed with paper - everything paper, to thrifty finds, to sewing, to most recently wood working (thanks to Ana White) OH - I love photography too - you will see a lot of pictures of my kids.

I just want a place to release all my creativity. Maybe I can inspire somebody out there.

LinkWithin

Related Posts Plugin for WordPress, Blogger...