Tuesday, March 8, 2011

DIY Crown Molding Shelf

I took this random light that we had in our house - it was homemade from the previous owners and in our kitchen with florescent lights - and turned it into crown molding shelves!


Here is how I did it.  After a few meltdowns (including, not being able to figure out how to move my miter saw - looking at the hand held miter saw with the saw covered in glue so it wouldn't work, being angry I couldn't find the extension cord and plug in the garage) - I stumbled upon this lighting contraption that has been sitting in our garage waiting to be thrown out.  See - everything happens for a reason!

I took out the electrical feature of the light - so I was left with a crown molding box.

Then I got thinking - I need to find something to sit on top - what do I have...what do I have...Do you remember the dress-up center I made for my daughters birthday - I made it from my kids armour.  Well this is one of the drawers that was left over.  I had two of them!
And it fit perfectly on the top!!!
So then I marked a fair amount over from what I needed - and made two cuts - one on each side with our miter saw.

Then I marked where I actually needed it - and cut it again.
See - it's starting to take shape!
Here is another view - you can see how the original piece was constructed - in case you want to make it from scratch.  The white piece with the screws though was used to secure the electric part.
Then I needed something to have on the bottom - because you don't want to see up into the guts of the shelf - right.  So - you know those cheap flimsy bottoms to drawers.  They are white and cheap is the best way to describe them - I had one left over from the dresser and I cut it to fit - it works great - I just glued and clamped it in - because gravity would really take care of the rest.
My husband and I had a debate over which way the top should go - up or down - he won - it looked more like an additional piece of crown with the drawer facing down. 
Then we glued and nailed it down.
It's starting to take shape!
Then - how do we hang this awesomeness to the wall????
We took a 2x4 (probably heavier than it needed to be), glued and nailed it to the top of the shelf - so we could use anchors and anchor it to the wall. (side note of an opps - make sure it's where you want it before you nail and glue it - mine was out to far - and wouldn't sit on the wall.  We took a jig saw to it to try and trim it - well it was nice enough to pop off!  So we moved it back - then glued it and nailed it where it should have been - lesson learned)
Then we have to fill all those silly holes - and sand sand sand...
Here is just another view of the inside.  Then prime and paint everything.  One coat of prime - and then about 3-4 coats of white flat paint (there were a lot of imperfections - we didn't want to draw attention to!)

And Tada.....Our decorated shelves - that were FREE!!!!  I love that price - we had everything on hand!  Except the decorations - we decided to actually buy something to put on them!  Fancy that idea - right!
Another shot.
I just love that picture of my girls running - brings in the color's of the room.
OK - now for a secret - see on the bottom of the shelf - there are these circle shapes - yup - they are circle shapes....Time for my confession....When we attached the 2x4 and the anchors to the wall - the shelf tilted down - a lot!!!!  So we put in these wood circles I had in the basement - it was the perfect amount to tilt the bottom out - to make the shelf flat.
See - you can see it a little better here.
See how nice that bottom turned out with that flimsy material.
We need to do a little more finish work - filling in the wholes with some caulk - but - we wanted to get them up in the worst way!
One more picture - I was trying to not use my flash - playing with my photography skills.

As a side note - and another "opps" that bottom shelf fell :(  My husband was taking it down to do some finish work - and we couldn't get the anchors to work right.  Good thing it fell on him and not our kids.  We are going to re-evaluate how to attach to the wall....Needs to be sturdy with three little crazy kids running around - this is their room....Keep you posted on how we net out.


Linking to these parties

Monday, March 7, 2011

I Heart Faces - Best Face February

I Heart Faces - Best Face February


This is one of my favorites from February.  This is my little man - and his first experience with finger painting. He did SO good!!! And had so much fun.  The painting on his face is actually curtesy of his father!  Made for some great pictures though!  Now I say finger paint - and he holds up his fingers for me.  Anything that keeps him entertained for 20 minutes is good in my book!!!
 
Check out some others over at I Heart Faces (there server has been down - so keep checking back)

Sunday, March 6, 2011

Favorite Cooking Sites

I have been wanting to cook lately.  Even though my husband and I are trying to go on a health kick - it doesn't mean you have to eat boring - right!  Here are some of my favorites!  I feel like I ate a full meal after spending hours looking at their awesome food!!!!

My top one is Ree at The Pioneer Woman Cooking I don't know what took me so long to find and follow her site - but I am addicted now!! Here are some unreal shots - you have to check out her cooking - WOW - I think her cookbook may be my next purchase!

This Spinach and Mushroom Quesadillas with Fontina and Goat Cheese - has me SO addicted to Goat Cheese - it was SO good!

Oh my cheesy wonderful - awesomeness this Pasta ai Quattro Formaggi is to die for!!!!!

I could go on and on for days about her awesomeness!!  And that is just her food - I could go on for weeks about her photography - wow!!!  What I would give to spend a day with her!

Then we have Closet Cooking - I don't know how I stumbled upon this site - but at the same time - I don't know how I didn't find him sooner!  I haven't tried any of his food yet - because I just found him - but can't wait to try some of these:

Asparagus and Ramp Pesto Pasta

Spinach Pesto Grilled Cheese Sandwich


Pumpkin Gnocchi in a Creamy Gorgonzola Sauce


And then we have Two Peas and their Pod.  How cute are they!!!

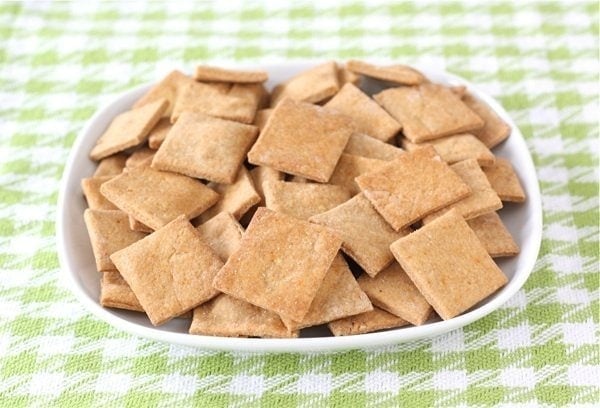
Seriously  - homemade Wheat Thins - yummy!

What an awesome BBQ Chicken Salad.

I have been wanting to eat a stuffed pepper again - haven't had one in a while - this Orzo Stuffed Pepper looks amazing!!!


Hope this made you hungry and wanting to check out these awesome sites!!!  Let me know your favorites so I can try them too!

Friday, March 4, 2011

Fix It Friday - March

LOVE Fix it Friday over at I Heart Faces!

Here are my "fixes" I used all of the awesome Ree - The Pioneer Woman's Actions. 

On this one I used Colorized and Boost I think it was.


This one I did Seventies and Fresh & Colorful, with a little edge burning.


Here is the original.

Go visit some others over at:

Wednesday, March 2, 2011

Baby Blanket tutorial

I made a bunch of blankets for Christmas.  I believe it was 7 - 7 blankets with names on them.  From that - I had my SIL - actually 2 SIL's ask if they could get blankets.  So here is my first one - done.  I took flannel that was on sale at Joanne's and then Chenille (LOVE this stuff - so super soft!), but so super expensive too.  Get it on sale!

So here is my flannel material.  I bought 2 yards.  I don't use 2 for the blanket - I typically use the excess to cut the name out and sew it on.

This is the Chenille material I bought a whole bolt because during Black Friday it was like 60% off or more - then additional money off my total - so I stocked up.


Now - I am a cheap - no - thrifty crafter!  I make the MOST use out of all my material.  So - how I found to do this - is take soft material - I rolled it off the bold - so it was still folded.  Then I took the flannel the short side - I think it is the 36 in side - or 45 in side.  Lined them up - and cut along the side.  This probably makes no sense. 


This is the side that I cut - it may show it a little better how I make the most of my material. 


Then spread out the whole thing on the floor and get to pining. Put your right sides together - and wrong sides out.  Then check to make sure the rights sides are together - then check one more time.  The reason I say this - I can't tell you how many times I sewed the wrong way!


When you think you are done pining - then pin some more.  Chenille is very slippery.  Pin Pin and Pin some more.


Make sure you leave a gap!  You are going to have to turn it inside out and top stitch.


Then you got it - pin some more - I pinned about ever 2 inches.


Then go to your sewing machine.  I am in a lot - the only reason is my pin job was not the best - and where the white is - is where my flannel started.


When you get to the corner - put your needle down - lift your foot - and then spin your fabric - put the foot down, and start sewing again.  This will give you a tight corner.


I sew this on a straight stitch.


This is reminding you NOT to sew your opening.


Make sure when you are stopping and starting - to reverse stitch to lock the stitch in place so it doesn't unravel.


When you are all done - take your corner


And Trim it!  This makes it less bulky when you turn it right side out.


I then Iron (really quickly to be quite honest with you), the outside of the blanket - so when I top stitch they line up pretty well.  Make sure you push out your corners really well.

Then I put it on the zig zag stitch.


Then I also put it on the width of 5 - the width to the widest so it gives a nice zig zag.


I also pin the opening to make sure when I top stitch over it, it seals well.


Then - get ready to top stitch.  I have the foot follow the outside of the fabric.  Also - make sure you have enough thread!  I have run out before - it is not fun - because I didn't have the color - and didn't want to go back to the store.  Also - make sure your bobbin is filled.  There is nothing like having to stop your top stitch - to re thread - or re-wind your bobbin.


Ahhh - this happened to me so many times - I hate when this happens - I need a new sewing machine.  Or perhaps to clean mine.


Ta-da - it's done!!!!  Nice and soft on both sides - and a huge baby blanket for a baby shower.


You can package it with a nice ribbon - and you are a done - a thrifty baby blanket, handmade with love!  If I can do it - trust me - you can do it - you really only have to know how to sew a straight line.


Sorry if there are typo's - it's super late - and my bed is calling me after a long long day.

Tuesday, March 1, 2011

Diaper Cake Tutorial

Here is a little tutorial on the diapercake that I made for the Baby Shower.  If you haven't taken a look - make sure you check out the tablescape, Food, drinks, favors and my favorite - the dessert!

You start buy buying a big box of diapers.  This was a case - I believe there were 149 in the case (the cake only has 148 - my SIL's dog ate one!)  These were size 1 I believe.

To wrap them (sorry I don't have a picture of this my SIL was wonderful enough to wrap all of them!)  You keep the diaper folded as it comes out of the package.  Fold from the opening side to the closed side - so you don't have the flaps on the outside.  Then rubber band them together.

So when I got them - they were all rolled in bags.  So I started to assemble.

I just started grouping them - no rhyme or reason to them.  Once they were in a bundle - I took a large rubber band and put it around all of them - then filled it out with more diapers till it had the look I wanted.

Here is my next layer:

Then it starts getting bigger and bigger.  At this point you can either do small section with rubber bands - or use a ribbon - I used ribbon to secure them all together when they got big enough.

 Here is my biggest section.   I would actually recommend starting with the base - get it how big you want it - and then tier it down from there.  I put the ribbon around, and then just started shoving as many extra diapers I could so they wouldn't move.
Then came the decorating part - I kept mine very simple.  You can go more decorated - there are tons of awesome ones out there with toys and stuffed animals.  But - it gets REALLY expensive - really fast!  Unless it is your gift - I would keep it simple.

I had ribbon downstairs.  I took a fat satin ribbon - and a thinner but coordinating cotton ribbon - and just used glue dot's to keep them together.  At the ends I ended up using red sticky tape - much better to keep things stuck together - especially on satin.

Then I stacked them on top of each other - put the ribbon all the way around - and topped it with rolled roses from the extra satin ribbon I had left over.  Next to it on the right is the handmade invitations I sent out to family - it coordinates well with the diaper cake - don't you think!

You can see the ribbon looks like it is falling off - the night before the shower - I went around with the red sticky tape - and made sure all the seams were looking good - and when I put it on the dessert table - I had all the seams facing the back.

Here is how it looked with all the desserts.

I have seen cakes that use rods keeping the cake together - but - I kept it super super simple - they are just resting on top of each other.  It wasn't moving around a lot - and she is just going to unroll the diapers anyways - so this was super simple.  It really was just the cost of a case of diapers, and about $5 in ribbon.

Linking to these great parties:
Skip To My Lou
A Diamond in the Stuff   
All thingz Related - Anything Related
CRAFT  
Coastal Charm - Nifty Thrifty Tuesday  
Craft Edition  
Dittle Dattle  
DIY Show Off Project Parade 
Hope Sudios  
It's so overy Cheri
Mad in Crafts 
Sumo's Sweet Stuff
Tip Junkie  - Tip Me Tuesday  
Todays Creative Blog - Get Your Craft On

The Thrifty Home  - Penny Pinching  
Blue Cricket Design  
Tea Rose Home  
Savvy Southern Style  
My Backyard Eden  
Someday Crafts  
Sew Much Ado  
SevenThirtyThree
The Shabby Chic Cottage - Transformation Thursday  
Somewhat Simple - Strut Your Stuff Thursday  
House of Hepworths 
Beyond The Picket Fence  
Fireflies & Jellybeans  
Tales from Bloggeritaville  
Brambleberry Cottage  
Gluesticks
Momnivore's dilemma
At the Picket Fence
My Romantic Home 
The Shabby Nest
Remodelaholic
Finding Fabulous 
French Country Cottage 
Fingerprints on the Fridge
Fun to Craft  
Chic on a Shoestring Decorating
A Little Knick Knack  

LinkWithin

Related Posts Plugin for WordPress, Blogger...