Showing posts with label Party. Show all posts

Thursday, June 2, 2011

Chocolate Covered Pretzel Tutorial

Chocolate Covered Pretzels
Who doesn't love anything covered in chocolate.  I have been looking for favor idea's for my cousins bridal shower.  I wanted something "practical" if you will.  And like I said - who doesn't love stuff dipped in chocolate.

First get everything you need.  I used Pretzel Bags - found them at Joann's - they were only a couple of dollars.
Pretzels - try not to go cheap on them.  Buy more than you need - because they will break!
 

I counted out my pretzels and put them in a bowl so I didn't have to keep digging in the bag.

And Chocolate - duh!

Wax paper, Parchment paper, freezer paper.


So - set up a "double boiler". Fill in the bottom pan with water - put your other pan on top - and dump your chocolate in.

And keep stirring until it's melted.

Next pour yourself a glass of beer.  Ok - just kidding - but - if it helps! You will need a nice tall glass of some kind.

See - you need it to pour the chocolate in!

So you can dip the pretzel in!  It will give it some nice coverage without a lot of work!


Then lay it on the wax paper to dry.

So do them all and let them dry.  I learned at the last batch - if you "twist" them as you take them out of the cup at the lip part of it - it creates a really cool look on the pretzel - and saves you some chocolate!

Then get another color - put them in a little container - and do about :30 sec bursts in the microwave until melted.

 Put the melted chocolate in a ziploc bag.

Tada
Then clip one of the corners.

Drizzle it along all the pretzels - don't they look pretty!

You can see the top layer all lays together across all the pretzels.

Break them apart.

And then just clean up the edges - the chocolate breaks right off.

I put two in each little bag - a white chocolate with pink, and milk chocolate with blue.  The bags came with twist ties included.


All packaged and in a box ready for the shower on Saturday!

Linking to these parties!

Tuesday, March 1, 2011

Diaper Cake Tutorial

Here is a little tutorial on the diapercake that I made for the Baby Shower.  If you haven't taken a look - make sure you check out the tablescape, Food, drinks, favors and my favorite - the dessert!

You start buy buying a big box of diapers.  This was a case - I believe there were 149 in the case (the cake only has 148 - my SIL's dog ate one!)  These were size 1 I believe.

To wrap them (sorry I don't have a picture of this my SIL was wonderful enough to wrap all of them!)  You keep the diaper folded as it comes out of the package.  Fold from the opening side to the closed side - so you don't have the flaps on the outside.  Then rubber band them together.

So when I got them - they were all rolled in bags.  So I started to assemble.

I just started grouping them - no rhyme or reason to them.  Once they were in a bundle - I took a large rubber band and put it around all of them - then filled it out with more diapers till it had the look I wanted.

Here is my next layer:

Then it starts getting bigger and bigger.  At this point you can either do small section with rubber bands - or use a ribbon - I used ribbon to secure them all together when they got big enough.

 Here is my biggest section.   I would actually recommend starting with the base - get it how big you want it - and then tier it down from there.  I put the ribbon around, and then just started shoving as many extra diapers I could so they wouldn't move.
Then came the decorating part - I kept mine very simple.  You can go more decorated - there are tons of awesome ones out there with toys and stuffed animals.  But - it gets REALLY expensive - really fast!  Unless it is your gift - I would keep it simple.

I had ribbon downstairs.  I took a fat satin ribbon - and a thinner but coordinating cotton ribbon - and just used glue dot's to keep them together.  At the ends I ended up using red sticky tape - much better to keep things stuck together - especially on satin.

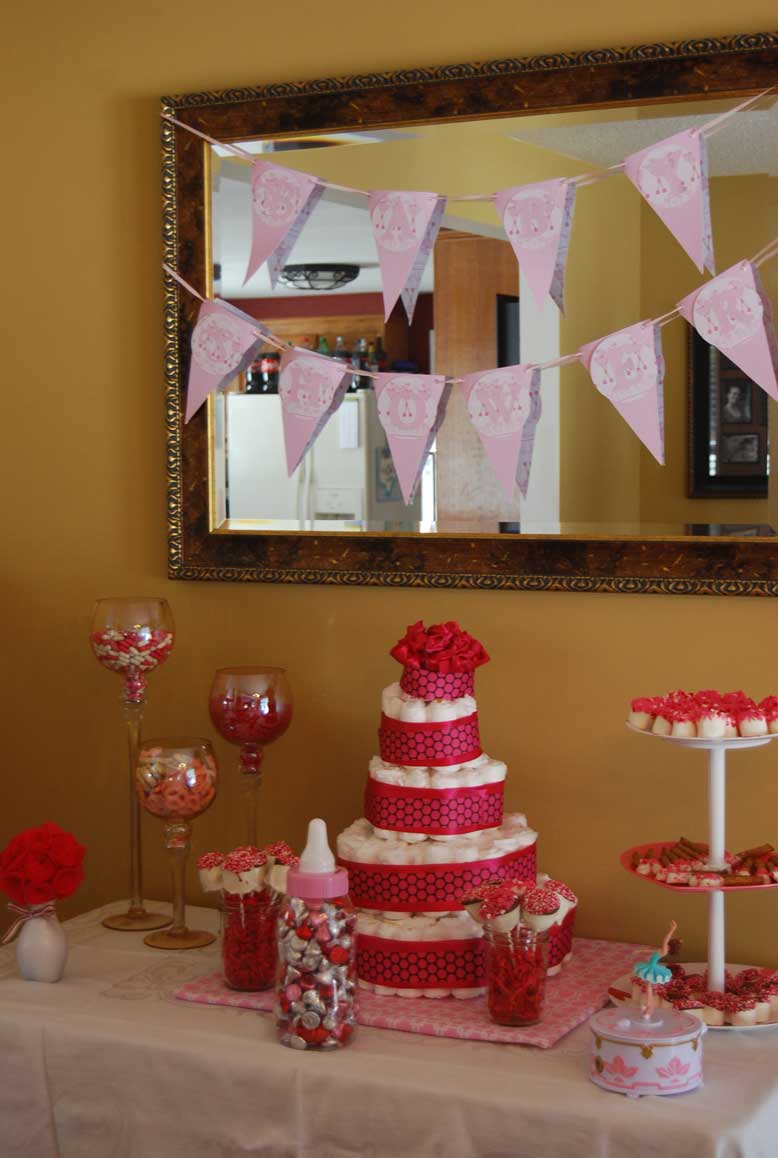
Then I stacked them on top of each other - put the ribbon all the way around - and topped it with rolled roses from the extra satin ribbon I had left over.  Next to it on the right is the handmade invitations I sent out to family - it coordinates well with the diaper cake - don't you think!

You can see the ribbon looks like it is falling off - the night before the shower - I went around with the red sticky tape - and made sure all the seams were looking good - and when I put it on the dessert table - I had all the seams facing the back.

Here is how it looked with all the desserts.

I have seen cakes that use rods keeping the cake together - but - I kept it super super simple - they are just resting on top of each other.  It wasn't moving around a lot - and she is just going to unroll the diapers anyways - so this was super simple.  It really was just the cost of a case of diapers, and about $5 in ribbon.

Linking to these great parties:
Skip To My Lou
A Diamond in the Stuff   
All thingz Related - Anything Related
CRAFT  
Coastal Charm - Nifty Thrifty Tuesday  
Craft Edition  
Dittle Dattle  
DIY Show Off Project Parade 
Hope Sudios  
It's so overy Cheri
Mad in Crafts 
Sumo's Sweet Stuff
Tip Junkie  - Tip Me Tuesday  
Todays Creative Blog - Get Your Craft On

The Thrifty Home  - Penny Pinching  
Blue Cricket Design  
Tea Rose Home  
Savvy Southern Style  
My Backyard Eden  
Someday Crafts  
Sew Much Ado  
SevenThirtyThree
The Shabby Chic Cottage - Transformation Thursday  
Somewhat Simple - Strut Your Stuff Thursday  
House of Hepworths 
Beyond The Picket Fence  
Fireflies & Jellybeans  
Tales from Bloggeritaville  
Brambleberry Cottage  
Gluesticks
Momnivore's dilemma
At the Picket Fence
My Romantic Home 
The Shabby Nest
Remodelaholic
Finding Fabulous 
French Country Cottage 
Fingerprints on the Fridge
Fun to Craft  
Chic on a Shoestring Decorating
A Little Knick Knack  

Wednesday, February 23, 2011

Baby Shower - Part 5 and Final - DESSERTS!!!

AHHH - Last but NOT least!!!  Dessert!!!!!  Isn't it glorious!  
Let's take a second to just - admire that yumminess.

 I made a banner on the mirror that says "Baby Shower".  Again - my Cricut - and I used...I forgot - I need to get better with remembering these things.
 I think I have pictures of the diaper cake being built - I'll put that in an upcoming post.
 Let's take a closer look.  This little thing cost me about $2.  I took a vase from the $1 store.  Spray painted it, and then took a foam ball from the $1 store - some felt I had, cut it in circles, and pined them on with straight pins - why you ask did I pin them - I was tired of burning my fingers with a glue gun :)
 HEHE - aren't these cute - I had candles in these in my living room.  And from looking at really cool candy buffets!  And thought - OH - I can put candy in these!  So I did - and it looked cute!
 My diaper cake - stay tuned for a tutorial on this.  Any guesses to how many diapers?!?!
 Cake pops!!!!  I used the brownie pop container for my cake pops - I have a picture at the bottom.  I dunked them in white chocolate, and then in chocolate, and covered the chocolate with sprinkles.  I put them in a mason jar with $1 store confetti.

 My other cake stand - remember from the Super Bowl Party and my tiered cake stands posts?  This time with yummy yummy desserts.  There is chocolate covered marshmallows (just the tips!) and then pretzels.


And lastly - it was time consuming - but SO CUTE!!! Cake pop - Baby blocks!!!!  I shaped them into squares.  You will notice that I was using tooth picks to dunk my blocks in chocolate - I am here to tell you it does NOT work - don't waste the tooth picks!  I ended up with a fork and spoon instead :(


Here is how it turned out - I trimmed them with frosting - and it says Dan and Tina Baby Girl.  I wish the picture was better - but - they were good - strawberry!

Here are my cake pops in the brownie pop container.


 And - here is my big FAIL!!! :)  I wanted to make shaped cake pops.  I stuck them in chocolate molds.  That actually worked - word of advice again - use a cooking spray first - they come out MUCH easier!!!

So - I wanted to try something different - I used them with suckers - that worked fine too.

Ready for my fail - I took melted frosting - because when you heat it up - it becomes more liquidy.  So - I heated it up - dunked them all in (which they stayed on there sticks! 

I go to take them out of the fridge - hoping for a hardened cake pop on a stick - guess what folks - frosting does not harden :( they were sticky - I was so sad - because they would have been adorable!  Ug!  Adorable - had they been dipped in chocolate.  Sigh - lesson learned - and hopefully you won't make my mistake!

 But - I can't leave on a fail note!  So let's take one more look at that yummy dessert table!

LinkWithin

Related Posts Plugin for WordPress, Blogger...