Friday, April 29, 2011

Creamy Cheesy Tortellini


So I came home from work and thought - ok - time for another boring meal when I just throw some pasta in a pot, sauce right out of the jar straight onto the pasta - and put it on the table.  Sigh - such is the life of a full time working mom with three little ones...right....Cause why lie - typically that is all the food I have in my house. (If I have that)

So as I was going into the freezer - to grab my frozen tortellini, I found some frozen soup.  Sara and Kate over at Our Best Bites have the most amazing Creamy Tomato Soup!  I made if for my SIL baby shower, had left overs so I froze it.  So my brain got spinning - and I am so glad I found it!!!!  The meal was SO yummy!


Creamy Cheesy Tortellini
Package of Frozen Tortellini
1 1/2 cups of Creamy Tomato Soup
1/2 Onion
1 TBS Garlic
1 can mushrooms (I would have used fresh - didn't have any - go figure)
Approx 3 TBS Goat Cheese
Approx 3 TBS Feta Cheese
Approx 3 TBS Parmesan Cheese
Approx 3 TBS Romano Cheese
Salt

Cook Tortellini according to direction.
While pasta is cooking, saute your onion and garlic in either olive oil or butter.
Once slightly browned, add mushrooms or other veggies of choice
Drain pasta
Add pasta to pan with veggies
Add creamy tomato soup (if frozen - thaw first)
Add a handful of goat cheese
Handful of feta
Add Parmesan and Romano cheese as desired

Seriously good to the last bite!

Tuesday, April 26, 2011

Create your own stencils

Today I am going to show you how I got the names on all my caddy's. If you didn't see all my caddy pictures - check them out here.


So first - I need a die cutting machine (I am too lazy for stencils).  I have a Cricut, so that is what I used.  So I used that.  I set my dials to a blade depth of 3 or 4.  Then I did a pressure of Medium (3), and the speed based on how delicate the cut is.  Mine wasn't bad - so I set it to high.  Instructions do come with the vinyl.  Follow them.

So below - you will see what it looks like after the cut.  They do sell transfer material specifically for vinyl.  If you have read my blog - you know I am cheap...no...not cheap - thrifty!  So - that stuff can get expensive - so I bought clear contact paper.  I cut my transfer paper to the same size as each word I cut out and was ready to go.

Here you can see a little shine on the vinyl, that is the contact paper.  Then rub it down with a credit card, Popsicle stick, anything really.

Then depending on what you want to do - you start to peel up the letters.  I wanted to paint the words on the caddys.  So I lifted the outside of the letters.  You can see what's stuck to the contact paper - that is what I will put on the caddy.  What is left on the original is left over.  (Good thing for me - you will see my craft fail in a bit!) You could also do it the opposite if you wanted the vinyl to be what gets stuck to the caddy.

Here you will see it ready to adhere to the caddy. It's stuck to the contact paper - this makes it a smooth transfer - trust me!  If you have tried it without a tranfer medium - it is an ugly un-smooth mess!

Here is the vinyl stuck to the caddy - ready to be painted.  Make sure you stick it on good.  Rub with a credit card, or your finger - make sure it is sealed tight around where you will be painting. 


Then - pick a paint color and put on a coat at a time.  I just used acrylic paints, and a cheap foam brush. 

Here is another one, you can see the air bubble between the H and the a

My assembly line set up of paint.  When it is dry - peel up the vinyl and you are ready to go.  If the paint isn't dry - it can leave some paint where you don't want it to be.

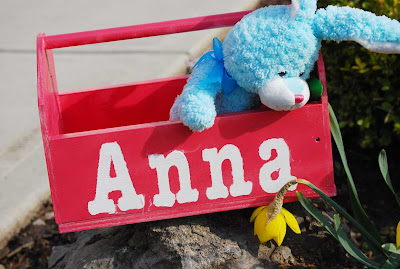
Finished product with paint. 

You will notice this one - not the original green I painted - but the same purple as the vinyl - ok - it is the vinyl. 

Here are some lessons learned and suggestions.
  1. If you can- use a cutting program to work out your names.  I used Sure-cuts-a-lot (I also have the gypsy for the cricut, and cricuts software - they both work as well).  I could see my 12x12 mat, and lay out exactly how I wanted it to be cut.  I measure my wood - and figured out I wanted it cut 4 inch high by 10 in wide.  So they were all pretty uniform, no matter if there was 7 letters or 4.
  2. If you can and have it - use a thicker paint than acrylics if you don't have a lot of time (or patience).  The lighter color acrylics took a lot of coats, because they went on thin.  But - it's cheaper and you can get a lot more colors!
  3. My big craft fail and lesson learned.  Don't use too many different types of paint.  I used a gloss spray paint, then an acrylic paint, and then a semi-gloss on top of that.  I went to peel off the vinyl - and guess what - yup - you got it - the paint peeled off to...Sigh....So I peeled off all of it, and used the actual vinyl instead.  Thankfully it happened on a girls one that I could use the purple, and not a boys one I would have had to start all over.  I hate wasting stuff, not to mention time, it was Saturday night when I finished them and I didn't want to paint again.

Monday, April 25, 2011

Pet Entry over at I Heart Faces


This weeks challenge over at I Heart Faces is Pets.

We have about as many pictures of our dog's as we do our kids!!!!  It was hard to pick.  But - I had to go with this one.  This is our Golden Kain.  We lost him around Thanksgiving of 2010.  It was a hard thing to go through for us - and the kids.  This is one of my favorites of him and my little man.  Kain wanted that ball so bad - but he was such a gentle doggie, he just sat there and watched him with it - waiting for him to put it down so he could claim it as his own again.


Here are some more - just because they are in that same series - and so cute!  Look at that intense look on Kain's face - his eyes never leave that ball!


Sunday, April 24, 2011

Caddy Time!

I don't know when I first stumbled upon Ana-White - but I can't stop looking at her site - and I have turned into a build-a-holic.  I first saw her plan for her toolbox here.  You have to check out what That's My Letter's caddy here, she pushed me over the edge to just get my butt in gear and make these for Easter.


And - while I am giving prop's for some awesome sites - you can't leave out Knock Off Decor.  Pottery Barn has these caddy's for $89 a piece!!!!  Can I tell you how much I spent on 7 of them!!!  I made all of them for $2.00 total - for the dowels, the rest were done by using scraps!

So I got building.  I wanted to use my scraps left over from my basement build.  I used the scraps I could, and tried to cut out as little as I could.  The table saw scares the crap out of me - yup - I said it!!!  So - I improvised as much as I could. 

When I cut out the sides - because I am not - well - handy at the jig saw yet - I clamped and cut at least two at a time - and those were the matching ends.  I measured my dowel - and cut the sides to be the same.

Then I build the caddy's.  I took the front piece, glued the sides and shot them with 1" brads.  Then added the other side.  Lastly I put the dowel.  After they were all build - I traced one at a time then cut with the jig the bottoms, and nailed them down.


Then it was time to prime.  Originally I primed outside - note to self:
DO NOT SPRAY PAINT IN THE WIND. 
Just a suggestion!  I had my 4 year old help bring all the caddy's out - started using a spray primer - didn't go so well - so we moved back into the garage - and used a non spray paint form of primer.

Worked much better - and not to mention it was a little thicker to go on that raw wood - and I used so many different types of wood that it kept it more uniform.

Then on to the paint.  I used three colors, all Kyrlon paints.  I didn't want a gloss - but that is all I could find.  I kind of like the warn look - I could have put multiple layers of paint on - I ended up with two coats of each.  I like it.  This is the Green.

A bubble gum pink. 

And a purple. 

Here are the three colors up next to each other. 

Now just for a lot of pictures - I couldn't stop taking pictures of them - the looked so adorable!!!!  Three are for my kids, and then the others for our nieces and my nephew.  (Don't worry Baby Hailey I'll make yours next - we'll bring when we come to visit this summer!


Here they are all lined up and ready to go on Easter afternoon!

And here are my kids using them this afternoon.  Hay had such a blast!!!!  She was overjoyed all day - it was adorable!!!! 

I love this shot!

My oldest - she was so excited to sit and open each one.

My little man was so funny - he found about 3 eggs - but when all the other kids were sitting at the blanket opening their egg's he wandered around and just stole them out of their baskets.

So - he figured let the others do the work - and he'd sweep in at the end. 

Final shot of the caddy's at the end of the day - they worked great.  They were nice gifts, and great baskets.  I was happy!!!!

This week I'll post how I did the names.  I used my cricut and vinyl.


Linking up to these parties:

LinkWithin

Related Posts Plugin for WordPress, Blogger...