
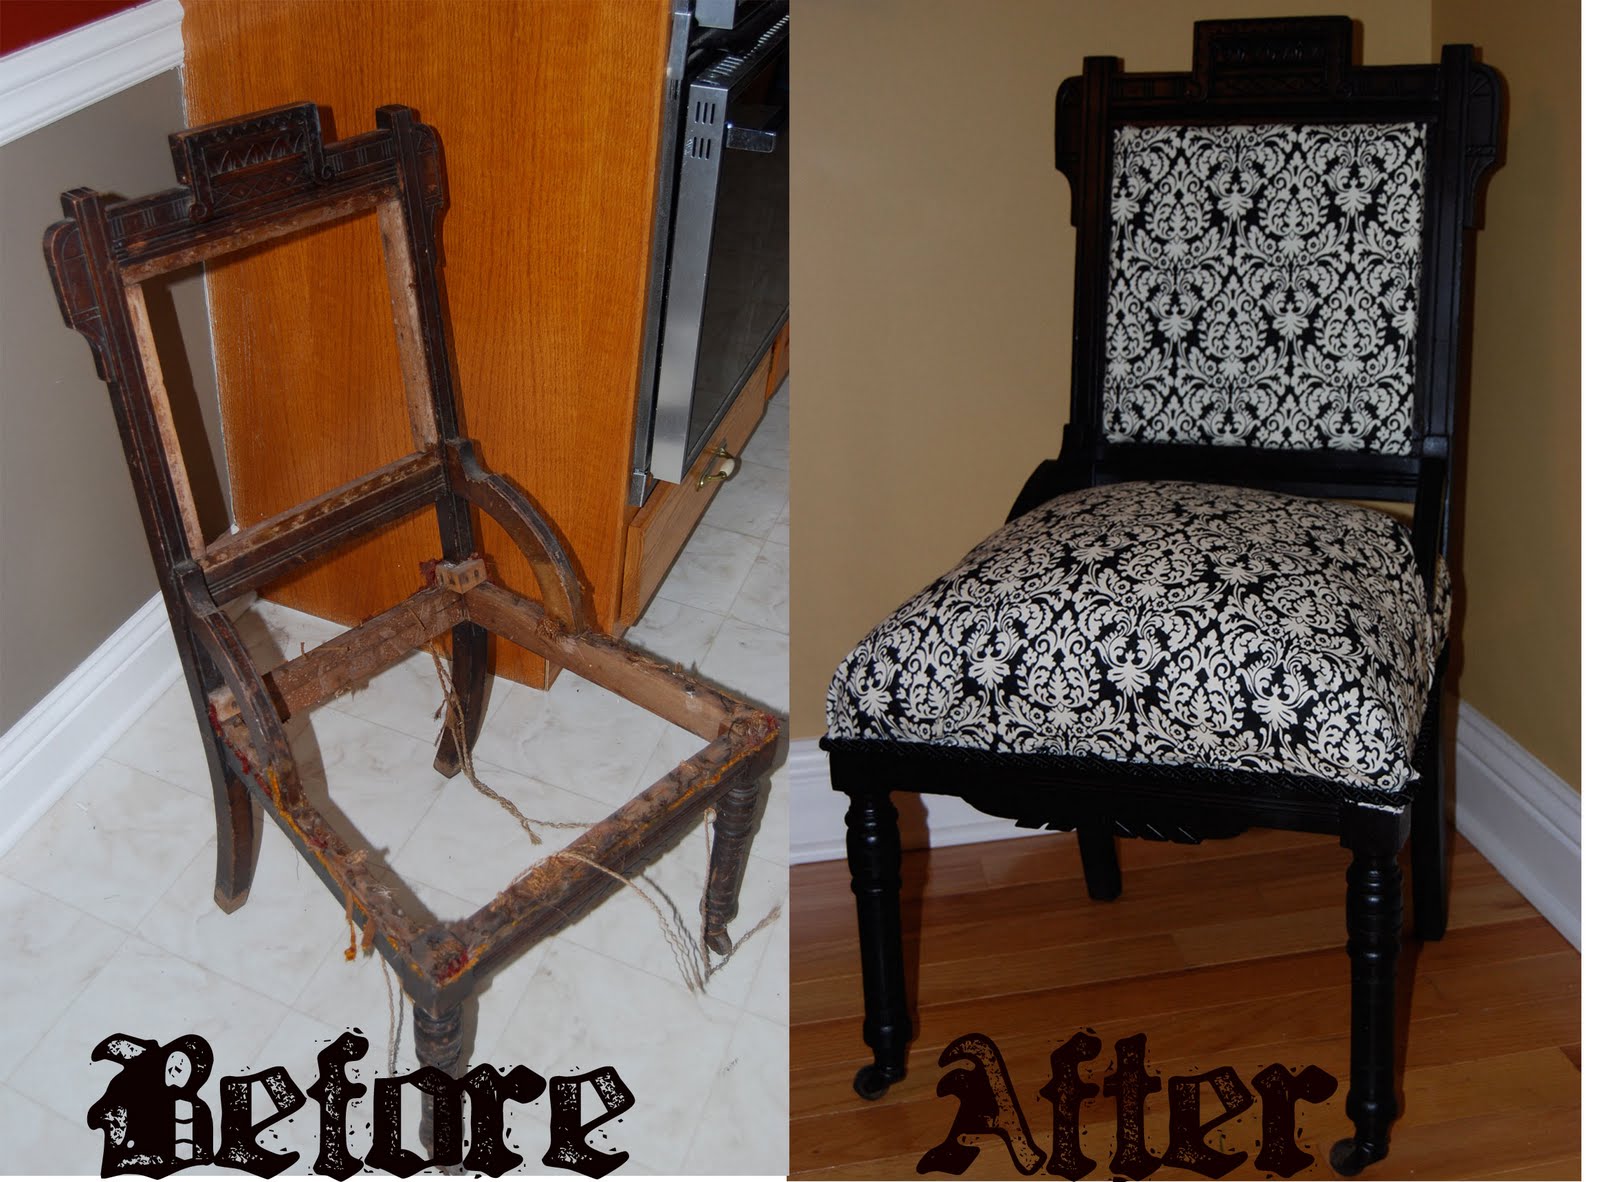
So when I moved to my new house over a year ago my MIL gave me 3 antique chairs because she knew I liked to refinish things - and do projects. So - 18 months later - I finally got around to them!
Here is what it looked like first:

 I had to pull up all the nails - there were a lot of old nails - and a lot of blisters on my hand!

So then I sanded the chair down a little, sprayed it with $1 can of spray paint from Home Depot. I put about 3 coats on. Sprayed it with a sealer so the paint wouldn't chip. Everything was matte finish.
 When that was done - I went shopping for some fabric and padding. Yeah......I am so cheap! Well - this stuff was expensive. I had some foam in my hand - checked out and the total was over $60!!! I was like...ummm...how much was that? That one thick piece of foam was almost $35!!! Yeah - I said - no thank you!!! I bought two yards of that fabric - because I want to add chair cushions to 4 other chairs I sprayed black to match. I bought trim and a thin piece of cushion for the top of the chair - that totaled around $25 with a handful of other stuff. I only used about $5 worth of fabric on this chair though.
 I cut (OK - I had my husband cut) the bottom part -he used the jig saw - and cut a piece of 3/4 in MDF to fit on the bottom. I nailed it down first. then I took an old pillow from an old couch cushion, and put that on top. I then took the fabric - cut a piece that came down to where I wanted to staple. I pulled everything taught - and stapled everything down around the edge.
 Then I had these pieces of about 1/4 in MDF cut to make little cubes - I had some left over - so they were the perfect size - no cutting needed. I took the thin foam I had - cut a piece to fit the square - and stapled the fabric on. Then I did the same for the other piece.
Went out to the garage - and put 4 pin nails in each corner - one on the top front - and one on the top back. So that they held in place. It worked perfect!!!!
Then I took my trim and went around the outside of the seat. Took the hot glue gun and went around about 3-4 inches at a time, so the glue didn't cool. It isn't perfect - but it looks great!


 Not bad for taking me a year to get motivated to do it. It probably was about $12 in product cost. I still have two more that match that need to get done. I do know where I want two of them to go - can't wait till that is done so I can show you!!! Let me know what you think, or if you have any other questions.
Parties: (Check out these link parties there is some great stuff - leave comments - everyone loves comments!)
Thanks for linking to Take-A-Look Tuesday over at Sugar Bee Craft Edition - I featured you today! - Mandy, www.craftedition.blogspot.com
ReplyDeleteit turned out beautifully! i love the glossy black paint and fabric you used.
ReplyDeleteWow! I know how much effort you put into this project and it paid off. Your chair looks lovely :)
ReplyDeleteFantastic job on that chair. Love the thick cushions you added. Thanks for linking this week.
ReplyDeletethat looks fabulous! and i am sure it was a whole lot of work- i am super impressed!
ReplyDeleteLove this chair so much!
ReplyDeleteDon't you just love pulling all of those little tacks out....Definitely worth the hard work. The color combo you chose is beautiful.
ReplyDeleteTake care,
Lisa
It looks beautiful! Love, love, the damask :)
ReplyDeleteI love it!! I'm so looking for chairs like that and am encouraged / inspired by your endeavors - Thanks for sharing, it is beautiful!
ReplyDeletexoxo,
Ellen
Wow! This turned out so great !I love it!!!
ReplyDeleteHi there- this chair came out great- I love the fabric you chose and the chair itself is such a treasure! Thank you for sharing at Feathered Nest Friday! :)
ReplyDeleteWow! That was an amazing transformation and I love the fabric choice! Thanks so much for linking this up to Inspiration Friday this week!
ReplyDeleteVanessa
Great job!
ReplyDeleteFabulous! I love the contrast of the antique chair - painted black - with the trendy new fabric design.
ReplyDeleteThanks for linking to the party. Come by the cottage tonight to see your blog spotlighted.
By the way, I just joined you as a follower.
Liz @ the Brambleberry Cottage
http://thebrambleberrycottage.blogspot.com/
I love how it turned out.
ReplyDeleteBtw, do you want to gain more blog followers? Then come on and join my "Swap Followings" Linky Party. This is an excellent opportunity for every blogger to meet other bloggers, follow them, and be followed in return. How does this work? Just simply "swap your following" which goes like this, "I follow your blog so please follow mine." The requirements are simply include the party button in your post, link up, then follow 2 or more blogs so they can follow you in return. When you decide to join, click http://www.homemakeronadime.com/2011/01/swap-followings-linky-party-012411.html and this will lead you to our party.
The link is going to close at 11:59 pm on Friday and will open again on Monday at 5 pm, PST.
Bring your best virtual smile, be prepared to meet great bloggers, and see you there! :)
Beautiful! What a nice face lift for an old chair :)
ReplyDeleteGorgeous! Very impressive :)
ReplyDeleteGreat job! I love that fabric and used it on a chair at my house, too.
ReplyDeleteYou did a fabulous job.
ReplyDeleteWow! What a great transformation! I love damask! I have plans like this for a few chairs as well!
ReplyDeleteLove the chair! What a difference, you did a Great job!!
ReplyDeletethis turned out beautiful!
ReplyDeleteI know it’s late, but congrats on your masterpiece! It’s definitely worth the wait! I’ve seen a lot of seat restoration, but this one impressed me the most! Imagine, from an aged-looking chair, you turned it into a magnificent seat! You make a good furniture doctor!
ReplyDeleteDarryl Margulies